
Troubleshooting VYALEV®
(foslevodopa/foscarbidopa)
The information on this page provides guidance for situations that may arise when you are using VYALEV, pump and its delivery system.
If you have read through the sections below and are unable to correct the issue, or if you do not understand the issue, contact your prescribing specialist or the VYALEV support team on 1800 230 608.
For a step-by-step guide on how to use your VYALEV treatment, refer to the VYALEV Administration Guide.
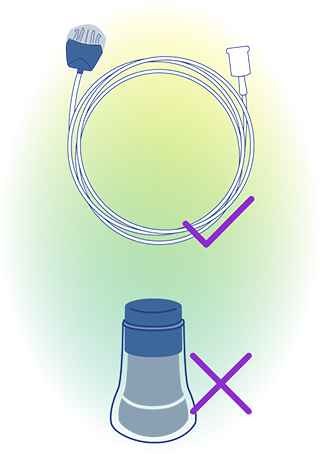
If you have trouble transferring VYALEV medicine from the vial
to the syringe:
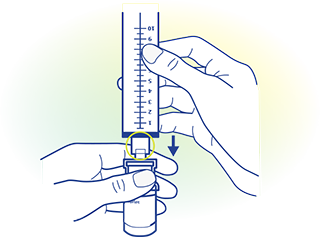
- Ensure that the vial adapter spike is centred on the rubber stopper on the top of the solution vial before you apply a downward force.
- Press vertically downward until the vial adapter snaps snugly into place onto the vial.
If you spilled your VYALEV medicine:
- On a table or on your skin, use a damp cloth and wipe it off.
- On your clothing, you can blot it dry with a towel, let it dry on its own, or remove the clothing and wash it using water and laundry detergent.
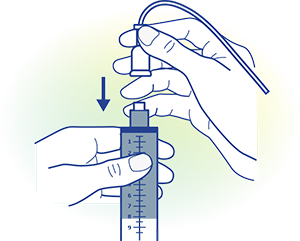
If the syringe does not fit into the pump:
This means either the syringe plunger rod pusher has not retracted or the air is not fully removed.
If the syringe plunger rod pusher isn’t fully retracted:
Step 1: If the syringe plunger rod pusher isn’t fully retracted, remove the syringe from the pump and close the pump lid without the syringe inside. Then, follow the instructions on the pump display, pressing the button to indicate that there is no syringe in the pump.
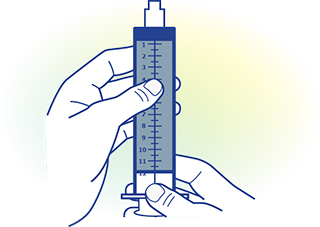
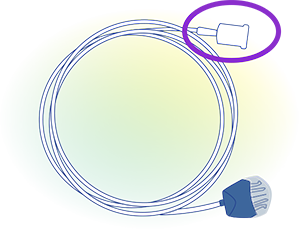
If there is still air in the syringe tip:
Step 1: If the syringe does not fit into the pump with a fully retracted syringe plunger rod because there is still air in the syringe tip, re-attach the syringe to the vial adapter that is still attached to the vial.
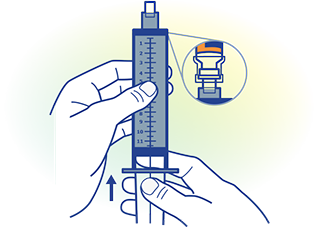
Step 2: With the vial and syringe pointed upward, slowly push all remaining air and a small amount of liquid back into the vial. Then reattach the infusion set tubing and try again.
Step 3: After the remaining air has been removed from the syringe, try to load the syringe again.
If you have already tried the steps above but the syringe still does not fit into the pump, contact the VYALEV support team on 1800 230 608.
If you accidentally indicate that the tubing is primed, but you need to continue to prime:

Step 1: From the status screen of the pump, select ‘MENU’.
Step 2: Scroll and select ‘Change Supplies’.
Step 3: Scroll and select ‘Prime Infusion Line’.
If you need to change only the infusion set tubing and not the cannula:
The process is similar to that for changing the entire infusion set, except that you must disconnect the infusion set tubing from the cannula, since you are not replacing the cannula.
Step 1: Stop the pump.
Step 2: Disconnect the old infusion set tubing from the syringe and cannula.
Step 3: Discard the old tubing.
Step 4: Connect the new tubing to the syringe.
Step 5: Prime the tubing (navigate to ‘Change Supplies’ and select option ‘Prime Infusion Line’).
Step 6: Wait 60 seconds and tap away residual drips.
Step 7: Connect primed tubing to the cannula.
Step 8: Start the pump.
If you cannot loosen the tubing from the syringe during a syringe replacement:
- Try holding a warm, damp cloth in your hand to help protect your fingers from the sharp edges of the connector and try to unscrew it.
- If that does not work right away, let the dampness of the cloth soak in and try again.
- If you are still unable to loosen the tubing from the syringe, you will need to replace your infusion set.
Do not use a tool to loosen the tubing connector because it could damage the plastic part of the connector.
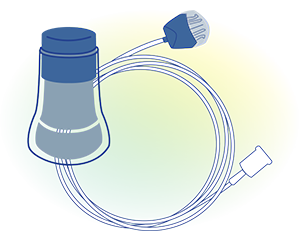
If you notice that the tubing is leaking or blocked:
- If your tubing is leaking where it is connected to the syringe, ensure the connection is tight enough and secured.

- If the tubing is damaged or blocked, replace the infusion set, including the tubing and cannula.
If the cannula becomes loose or detached from your skin after you have been using the treatment:
- You will need to replace the entire infusion set, including the tubing and the cannula.
- Remember to prime the new infusion set.
If your pump gets wet:
- Dry it off with a towel. If you accidentally drop the pump and it is submerged, contact your prescribing specialist.
If the pump is not responsive or the display screen remains
blank after any button has been pushed:

- Replace the battery with a fully charged battery.
- If the pump still does not respond, remove the battery and wait for 10 minutes. Then, insert the fully charged battery.
- If the pump still does not respond, contact your prescribing specialist.
Always use your carrying accessory to help ensure that the pump is protected and prevent it from dropping. Make sure the case is sealed properly and securely.
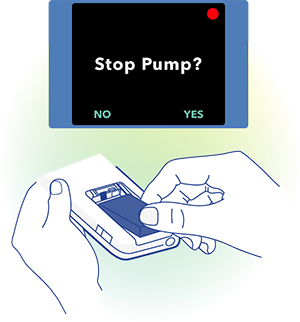
If you want to temporarily disconnect your pump:
You will need to stop the pump, disconnect the infusion set tubing from the cannula, and tap away any drips from the site connector.
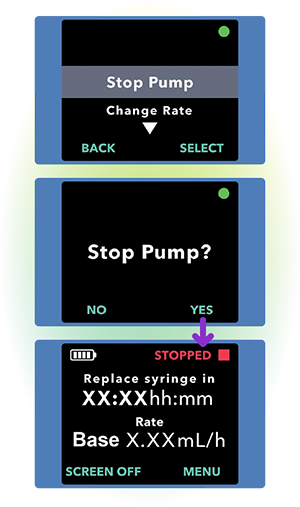
Step 1: Turn on the pump display if needed.
Step 2: Press ‘MENU’ to display the pump menu options.
Step 3: Choose the ‘Stop Pump’ menu option.
Step 4: Press ‘SELECT’.
Step 5: Press ‘YES’ to confirm pump stop.
If you cannot remove the infusion set tubing from the cannula
during a temporary disconnect:
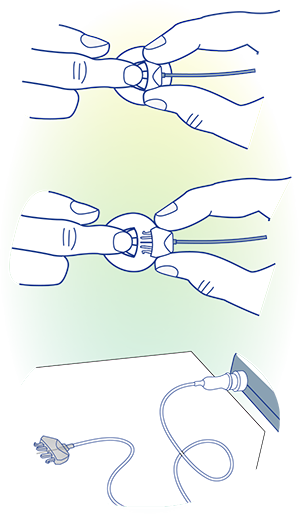
Step 1: Apply a warm, soaking wet cloth to the infusion set tubing for at least 2 minutes to help dissolve any dried VYALEV solution that may be in the connector.
Step 2: Attempt to detach the infusion set tubing from the cannula and lay it flat on a clean paper towel. Ensure the site connector needle is exposed so that you can inspect for a drop of VYALEV. Tap the site connector with your finger so that any drops break free from the needle tip.
Step 3: If you are not able to detach the infusion set tubing, re-soak the cloth and reapply it to the infusion set tubing for another 2 minutes. Repeat this step as many times as necessary until the infusion set tubing can be detached from the cannula.
Step 4: If you are unable to detach the infusion set tubing from the cannula after multiple attempts, you will need to replace the cannula and infusion set tubing.
If you need to stop using the pump for an extended period of time:
To stop using the pump and power it off completely,
Step 1: Stop the pump.
Step 2: Remove the battery.
Step 3: Replace the battery cover.
Do not suddenly stop using VYALEV without first discussing with your prescribing specialist.
If your fully-charged battery lasts less than 24 hours:
- You may need a replacement battery.
When the pump is operated at temperatures below 18°C or above 28°C, the battery will have reduced capacity.
The batteries need to be charged before the first use. Make sure to fully charge at least one of the batteries before you start your infusion.
If you have installed a fully-charged battery but the pump
does not power on:

- Make sure that the fully-charged battery is fully inserted and that the metal contacts on the battery line up with the metal contacts in the pump. For complete instructions on how to use and troubleshoot the VYAFUSER® Pump, please refer to the VYAFUSER® Pump Instructions for Use included in the box with your pump.
- If the battery is properly inserted and the pump isn’t powering on, remove the battery and inspect the contacts on the battery and pump.
- If there is a contaminant or something else blocking contact between the battery and pump contacts, attempt to remove it.
- If the contacts appear to require cleaning, follow the steps below.
If you need to clean the battery contacts:
Step 1: Ensure the battery is removed from the pump.
Step 2: Dip the cotton swab in isopropyl alcohol (no other cleaning agent is acceptable). You can get this from your local pharmacy.
Step 3: Depress the cotton swab against the inside of the container to remove most of the alcohol.
Step 4: Wipe back and forth with the swab against the contaminant on either the battery contact or pump contacts.
Step 5: Allow the contacts to fully dry before inserting the battery back in.
If you have tried all the steps above and the pump is still not powering on, contact the VYALEV support team on 1800 230 608.
For complete instructions on how to use and troubleshoot the VYAFUSER® Pump, please refer to the VYAFUSER® Pump Instructions for Use included in the box with your pump.

AU-ABBV-230286. AC-004199-01. July 2025.